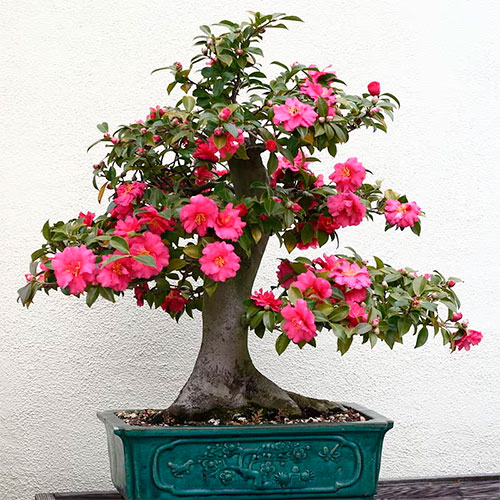
It is evident that the bonsai interest in this species is mainly related to its spectacular flowering. However, the other very important characteristics that Camellia possesses and that are appreciable in a bonsai should also be considered: the small leaf, the dense foliage and the short internodes. The reduced form also allows the character and peculiarities of each species to be appreciated more than in the wild. Among the most popular varieties is undoubtedly Camellia sasanqua, which is also the smallest and most compact. The styles it is best suited to are: formal upright, sloping, cascading, two-trunked and common stock, in medium and large sizes.
Location
Camellias do not tolerate harsh climates, so in winter they need to be protected from the cold by placing them in a sheltered spot, while ensuring they remain in a cool, bright location with temperatures between 2°C and 12°C. From March to September, they can be placed outdoors in a well-ventilated spot, but sheltered from direct sunlight, especially between June and August.
Watering
The common rule of watering whenever the soil feels dry to the touch is also ideal for Camellia, but bear in mind that during hotter periods and in strong winds, you will need to water more frequently. As it is an evergreen species, it is essential to water it frequently even in winter, but avoid excessive moisture, which causes the leaves to turn yellow and fall off. When the buds are about to form, watering should be moderate. In summer, water abundantly, maintaining average humidity.
Repotting
As this is a plant with good growth vigor, it is advisable to repot it fairly frequently, at least every 2-3 years. The ideal period is from mid-April to early June, when the base of the new shoots is mature and well established, i.e., when the shoot is still about half green, but the base has already taken on the typical color of wood. At this time, the white roots are developing vigorously, so transplanting can be done without any problems. When repotting, the young shoots should be shortened to 1-2 nodes, provided that there are new buds at the base. The ideal mixture consists of: 70% kanuma, 20% ready-made soil, and 10% sand.
Pruning
The formation of Camellia, which grows vigorously, is achieved mainly through pruning. It is important to prune unnecessary branches that grow in inappropriate positions from after flowering until the end of June. The procedure consists of removing wilted flowers, including calyxes, at the end of flowering, shortening the branches to 1-2 nodes. It is worth bearing in mind that, as this is a species that flowers easily, in order to improve its appearance, it is advisable to thin out the flower buds to give them a more uniform distribution. Flower buds are slightly larger and rounder than leaf buds.
Pinching
Pinching is an effective training technique, but in the case of young plants, it is best to allow the shoots to grow for a certain period of time in order to obtain enlargement before applying it. On mature specimens, however, pinching, which is practiced from April to mid-July, is an indispensable method for training the structure of the branches. The best way to do this is to let the green shoots grow to a length of 5-10 cm, then shorten them to 1-2 leaves using your fingers or tweezers. If you do this when the tip is still thick and compact, you will obtain branches with short internodes. Flower buds will subsequently form on the nodes left behind.
Wiring
It is mainly applied to long branches, which should be wrapped and bent downwards. Bear in mind that the bark of the Camellia is very soft and even when using copper-coated aluminum wire instead of copper wire, there is a risk of marking it, so it is advisable to always cover the wire, for example, with adhesive tape. Due to its rapid growth, the wire cannot be left on the tree for too long: it is advisable to check the wrapping frequently, removing the wire as soon as it starts to cut into the bark.
Fertilization
At the end of flowering, after pruning, apply Bonsan Stimulating Fertilizer combined with Bonsan Liquid Organic Fertilizer 3 times every 8-10 days. During other periods, use Bonsan Hanagokoro Solid Organic Fertilizer every 15-25 days, excluding July and August. Twice a year (in autumn and at the end of winter), apply Bonsan Hanagokoro Solid Organic Fertilizer; 6-8 times a year, it is also advisable to use Bonsan Mineral Curative Solution. To stimulate rooting, use Bonsan Organic Mineral Liquid Fertilizer with B vitamins instead of Bonsan Organic Liquid Fertilizer.
Care
As a bonsai, it has several points of interest, in particular its small size and thick canopy of small leaves, as well as its lush flowering.
0 commenti :
Post a Comment